
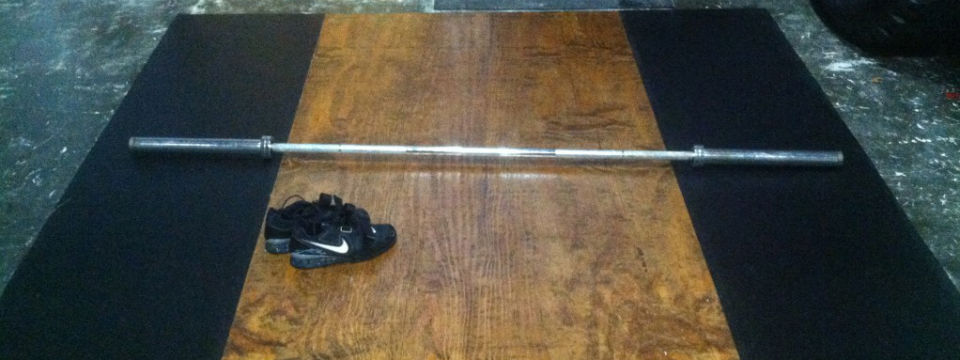
This project was long overdue for me since I recently started lifting in an area that is just solid concrete. We decided to build an olympic weightlifting platform ourselves because it seemed pretty simple and spending several hundred dollars didn’t seem necessary.
The platform we built was pretty minimal but does its job perfectly. We dressed it up a bit to make it look badass, which cost just a tad more, but isn’t necessary if you’re on a tight budget.

The most challenging part of this DIY: Opening an old liquid nails.
What you need to build an Olympic weightlifting platform
Essentials:
3 boards of wood (4’x8′)
Try to find wood that doesn’t have too many chips or dents. The thickness of the wood is up to you, just be cautious that your rubber matting will have to match this thickness. If you want to make an even thicker platform, you can buy two more slabs of 4’x8′.
2 pieces of rubber matting (2’x8′)
The rubber matting we used was fairly thin, so we had to use three layers on each side. There’s a lot of places to find rubber matting fortunately we were able to use leftover rubber from the initial construction of our gym. Here’s a link for a not-so-bad price: http://www.greatmats.com/products/rolled-rubber-sale.php
14 wood nails
The length depends on the thickness of your wood. Remember they must be able to go through two layers of wood. If they poke through the bottom, they’ll damage the floor underneath and eventually the platform. I used Liquid Nail to secure the rubber matting to the platform. If you wish to nail the matting down, you will need more nails.
2 tubs of liquid nails
Caulking gun
Drill
Yard stick
Marker
Dust Mask
Optional:
Can of wood stain
Can of polyurethane to seal the wood
Brushes for the polyurethane and wood
Sander
Sandpaper (60, 80, and 120 grit)
Painter’s tape
How to do it
Step 1
Use the liquid nails to glue the two bottom boards of wood together.
Make sure they align perfectly.

Step 2
Using the yard stick, mark off two feet from the outside of the platform. Do this at the front of the platform and back on both sides.
Place the third wood board in the middle of the two boards. You’ll use the marks to make sure it’s centered correctly.

Step 3
Drill the top board down. Use the yard stick to mark off where to put the screws so it’s symmetrical.
We used four screws in the front and back, and three down the sides (14 total).
Step 4
Use the liquid nails on the 2’x8′ space on the sides.
Do ONE side at a time.
Make sure to emphasize the corners and down the side and inside. After that, you can go ham in between, just remember you need enough liquid nails for the other side as well.
Step 5
Lay down the rubber mat on the 2’x8′ space with the liquid nails.
Make sure it’s perfectly flush with the inside. Press down the matting to be avoid clumping from the liquid nail.
Put some weight on top while it dries. Repeat step 4 and 5 for the other side.

Step 6
Put painter’s tape on the rubber matting to protect it from the sanding and painting.
Step 7
Wipe down the wood with a damp wash cloth to get off any wood dust or dirt.
Allow the wood to dry.
Step 8
Begin sanding with 60 grit. Next sand with 80 grit. Finally, use 120 grit for that smooth as a baby’s bottom feel.
Use a damp wash cloth again to get off the wood dust. It’s very important to make sure the wood is completely free of wood dust and dirt before staining.

Step 9
You can also use the 60 grit sand paper on the edges of the rubber mats if you had to cut the rubber by hand like we did. It’ll help give the appearance of a straight line.

Step 10
Paint the platform with the wood stain. Make sure you work a certain area at a time. Be sure to look for any clumping and spread out the stain using the brush if this occurs. Make the stain as even as possible by going over the specific area multiple times before re-dipping and evening out any spots with a heavy amount of wet paint. Only brush up and down, going with the grain of the wood. Allow to dry. Close any nearby doors or windows to prevent dust or dirt landing on the wood. Apply another coat if necessary. We were fine with one.

I was supposed to have taken her out to lunch :O
Step 11
Seal the platform with the polyurethane using the same technique in step 10. Allow at least 3-4 hours to dry then do another coat.
This will protect the wood from the elements and constant stomping.
Allow to dry.

The more dinosaurs on your mask, the more they fight the polyurethane odor!
Step 12
Take off the painter’s tape, clean the bad boy up and you’re good to go.
You’ve built an Olympic weightlifting platform!


